I deployed my portfolio site and wanted to try out github actions and this is my experience of automating the deployment. This article is more focused on how you can use the GitHub actions and how easy it is to deploy your code to GitHub pages rather than the portfolio site code.So every time you make an update or build to your website ,the changes are automatically reflected and this automated deploying process makes work much faster.
The way GitHub action works is you create actions in your repositories by creating one or more yaml files and these are called workflows.Workflows now can handle build tasks like CI CD. This means you use the action to test your code and push the site to the desired hosting platform (in this case GitHub pages ) when the main branch changes . First step assuming that you have a GitHub account is to create a repository having your website code in it.Now I have a bootstrap website but in the future I do plan on adding node JS so I already added package.json.
{% gist 7fc9e560ec958d6fb9876019e298e02f %}
{
  "name": "shwetarkadam.github.io",
  "version": "1.0.0",
  "description": "Portfolio222222222222222222222222222222222222222222222222222222222222222222222222222222222222222222222222222222222222222222222222222222222222222222222222222222222222222222222222222222222222222222222222222222222222222222222222222222",
  "main": "index.html",
  "scripts": {
    "build": "npm run clean && npm run imagemin && npm run copyfonts && npm run copydata && npm run usemin",
    "clean": "rimraf dist",
    "copyfonts": "copyfiles -f node_modules/font-awesome/fonts/* dist/fonts",
    "copydata": "copyfiles -f src/js/* dist/js",
    "imagemin": "imagemin src/img/* -o dist/img",
    "lite": "lite-server",
    "start": "npm run lite",
    "test": "echo \"Error: no test specified\" && exit 1",
    "usemin": "usemin index.html -d dist --htmlmin -o dist/index.html"
  },
  "repository": {
    "type": "git",
    "url": "git@github.com:shwetarkadam/portfolio.git"
  },
  "author": "Shweta Kadam",
  "license": "MIT",
  "dependencies": {
    "bootstrap": "^4.4.1",
    "font-awesome": "^4.7.0",
    "jquery": "^3.5.1",
    "popper.js": "^1.16.0"
  },
  "devDependencies": {
    "copyfiles": "^2.2.0",
    "imagemin-cli": "^5.1.0",
    "lite-server": "^2.5.4",
    "rimraf": "^3.0.2",
    "usemin-cli": "^0.6.0"
  }
}
Verify all your changes as correct by first in your root folder running the command:
npm install
npm install
and after installing node modules run the command:
run npm start
so you should get your output in localhost something like this

Now that you have ensured that the project runs properly in your local machine,it is ready to be deployed to GitHub pages. You will only need to commit and push your changes to the main branch of a repo and ensure that the settings are pointing to the correct branch to display a site for that. Now the file that does this is that deploy.yml file which we will use to create the workflow.
name: Build and Deploy
on:
  push:
    branches:
      - main
jobs:
  build-and-deploy:
    runs-on: ubuntu-latest
    steps:
      - name: Checkout
	uses: actions/checkout@v2
	with:
	  persist-credentials: false

      - name: Install and 06Build
	run: |
	  npm install
	  npm run build
      - name: Deploy
	uses: JamesIves/github-pages-deploy-action@releases/v3
	with:
	  GITHUB_TOKEN: ${{ secrets.GITHUB_TOKEN }}
	  BRANCH: gh-pages
	  FOLDER: dist
Now this yaml file which can be found .github/workflows/deploy.yml file in local ,you can rename the file whatever you like.It tells the github actions to install the project dependencies run a build script and put that required files in a output folder name dist and upload the contents of the dist folder to the gh-pages branch and if the branch does not exist it will create that branch.The workflow to deploy the site to github-pages you can find that from James Ives GitHub pages deploy action.
If you have any existing site or code and you want to publish it to get pages you only need this file to be added into your project.
You could go to your github repo Actions Tab -> Create Simple Workflow and copy paste the above content in your yaml file.
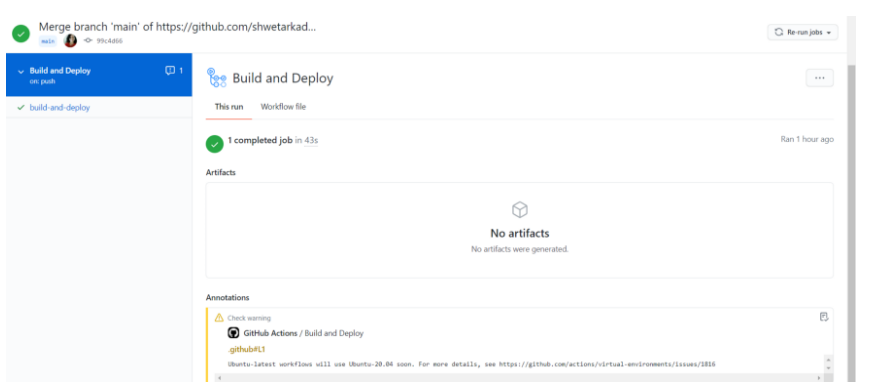
Once you have a site ready for GitHub Pages, and your project includes the .github/workflows/deploy.yml file, you only need to commit and push your changes to the main branch of your repository. You can the ongoing workflow by going to Actions=>build and deploy.Also this is the place where you can debug what went wrong in case your workflow fails.

After the GitHub Actions have run, ensure settings are pointing to the correct branch to display your site. Go to the settings of your repository and ensure that the source for GitHub Pages is using the correct branch. It is close to the bottom of the main settings page.

It does take some time at the start to load in the browser but once available you can click on the link in the green bar above. Now every time you make a push to the main branch ,the changes are reflected in the main site.
My Portfolio Site: Click Here
That’s all folks. Happy Learning.